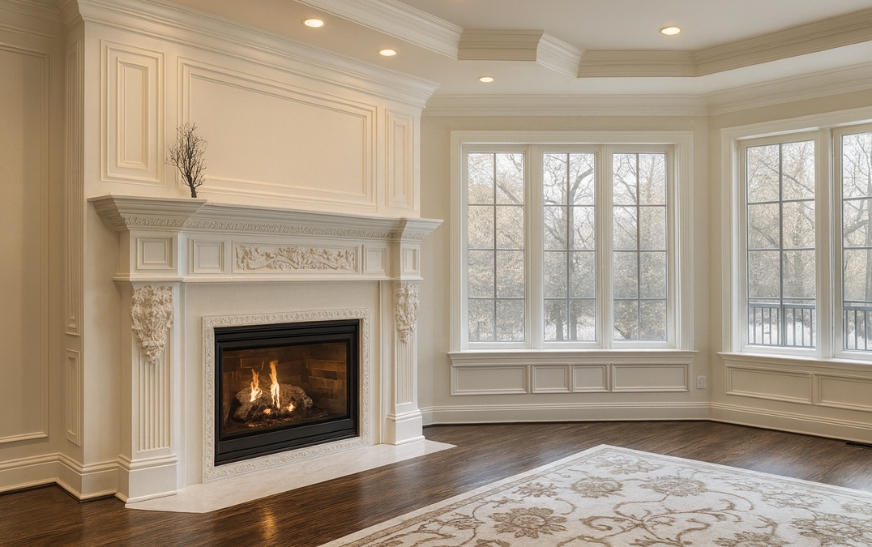
Traditional Fireplace Moldings
Renovating a fireplace is more than updating a focal point; it’s about shaping the tone of the entire room. A well-designed fireplace molding brings elegance, adds architectural interest, and creates a haven-like sense in your living space. If you’re drawn to timeless interior design trends, here’s how you can achieve a traditional-style fireplace molding makeover with your own two hands, without overspending or opting for flash that won’t last.
Choose the Right Molding Profile
To achieve traditional style, the molding profile matters. Look for crown moldings, rosettes, dentil details, or layered casings that evoke classic architecture. Profiles with subtle curves and clean lines offer depth without overcomplicating the design. If your space leans toward Japandi-style interiors or quiet luxury interiors, pick moldings that are detailed but restrained; balance is key.
The selection of materials is also crucial. Although wood is still popular, medium-density fiberboard (MDF) and engineered wood are less expensive substitutes that don’t warp and take paint well. Whatever you choose, make sure it blends in with your current fireplace surround and mantle.
Measure, Plan & Prep Precisely
Appropriate measurement cannot be skipped. First, clean the surface, check for damage, and remove any existing trim. Take note of the mantle shelf’s height and width, the fireplace opening’s measurements, and the distance that the molding will reach the nearby wall or hearth.
Create a layout sketch showing how the fireplace will be framed by the moldings. To see balance and spacing, draw outlines on walls using painter’s tape. Being well-prepared helps you avoid errors and save money on rework. Assemble the necessary equipment as well, including a miter saw, caulk, primer, paint, nails or screws, and safety gear.
Install Carefully for Seamless Finish
Planning makes installation easier to handle. To ensure that joints fit tightly, cut molding pieces at exact angles, especially corners. For stability, use finishing nails in addition to adhesive. If you’re using real wood, always allow for wood expansion where pieces meet.
After installation, caulk seams to create seamless transitions and use wood filler to fill in any nail holes. To get rid of sharp edges, lightly sand. Apply a primer coat after the surface is smooth; this is crucial, particularly for MDF or painted wood surfaces. Whether the molding is exposed to daylight or evening mood lighting, it will always look its best if the paint is chosen with ambient lighting automation in mind, one that reacts well under different lighting conditions.
Paint & Finish with Style
Traditional fireplace moldings often shine under crisp white or off-white paints, which contrast with brick, stone, or tile surrounds. You might go for high-gloss paint for the molding for a more formal feel or a satin/matte finish if you prefer a subtler, wellness-decor-inspired look.
If you want to lean into texture trends, consider layering finishes—such as a base coat with gentle glazing or even wood-tone stain for the mantelpiece. Natural material decor pieces (wood carvings, stone inlays) nearby help reinforce the traditional style and biophilic design.
Fireplace Makeover
Styling Around the Fireplace
Your newly molded fireplace deserves surroundings that echo its significance. Arrange furniture in flexible living room setups—facing the hearth for warmth and visual unity. Use mantel décor: classic candlesticks, vintage mirrors, or framed art. Soft touches like woven throws, greenery, or a few books can bring the décor together.
For lighting, incorporate smart lighting automation; downlights, sconces, or picture lights, to accentuate the fireplace as a centerpiece. Consider placing ambient LED strips discreetly behind the mantel shelf to highlight the molding at night.
Budget Tips & Durability
You want this makeover to feel premium, but you don’t need a premium cost. Here are ways to make sure your project is both affordable and lasting:
- Use MDF for trim pieces where wood would be costly.
- Reuse or repurpose old surrounds or mantel shelves.
- Paint with high-quality paints to reduce chipping and yellowing over time.
- Regularly dust and maintain to preserve the sharp edges and molded details.
Also, plan for minor electrical repairs if you add lighting near the fireplace. It’s safer to have a pro help with wiring than risk damages or hazards.
Bringing It All Together
With your fireplace molding makeover complete, the room’s character transforms. What was once bland becomes architecturally rich; what was generic becomes uniquely yours. You’ll feel a shift in how people move through the space—it draws eyes, invites conversation, and sets a tone of elegance without ostentation.
Conclusion
Doing a DIY fireplace molding makeover in a traditional style is one of the most satisfying interior upgrades you can undertake. With careful planning, the right materials, and an eye for detail, you’ll create a focal point that anchors your living room, elevates your home décor, and reflects enduring taste. Whether you’re inspired by texture trends, natural material decor, or legacy interior design trends, this project brings value beyond cost—and beauty beyond trend.